Showing 19 items matching korong road
-
 Ballarat Tramway Museum
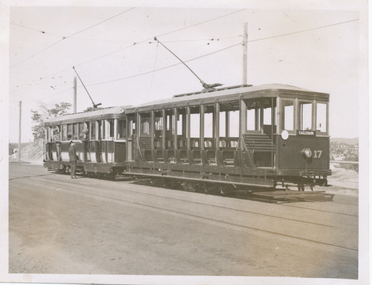
Photograph - Black & White Photograph/s, Wal Jack, Easter Saturday, 1941
... Mt Korong Road... and No. 22 at Mt Korong Road loop - Garden Gully Loop. Photo taken... at Passing Loop in Mt Korong Road, Easter Saturday 1941." In bottom.... No. 17 and No. 22 at Mt Korong Road loop - Garden Gully Loop ...Black and White print contained within the Wal Jack Bendigo and Geelong Album, see Reg Item 5003 for more details. No. 17 and No. 22 at Mt Korong Road loop - Garden Gully Loop. Photo taken Easter Saturday, 1941. Negative No. T191. No. 17 has the destination of "Eaglehawk" and is carrying a white disk at the front of the tram. i1 - scan of print in the album i2 - rear of image i3 - scan of negative at 3200dpi added 6/6/2020. On rear in ink "T191 State Electricity Commission Bendigo tramways / No. 17 summer car and "No. 22 Ex MMTB G Class standing at Passing Loop in Mt Korong Road, Easter Saturday 1941." In bottom right hand corner "W. Jack Photo".trams, tramways, bendigo, mt korong road, garden gully loop, tram 17, tram 22 -
 Glen Eira Historical Society
Document - Hopetoun, Hopetoun Street, 2, Elsternwick
... Korong Road... Italianate style Architectural features Glenhuntly Road Korong Road ...Two items about the inclusion of this property on the National Trust's Register: 1/1 copy of one page of typed correspondence and six page enclosure from T Chandler for Ian Wight, Assistant Administrator (Conservation) of the National Trust of Australia (Victoria), dated 19/07/1991 to the Chief Executive Officer, City of Caulfield, outlining that the Hopetoun Private Hospital has been classified in the National Trust’s Register and also noting a cc for Caulfield Historical Society. The enclosure is a six page typed classification report on Hopetoun by the National Trust and includes a reference list. 2/1 copy of one page of typed correspondence and six page enclosure from T Chandler for Ian Wight, Assistant Administrator (Conservation) of the National Trust of Australia (Victoria), dated 19/07/1991 to Kopat P/L, outlining that the Hopetoun Private Hospital has been classified in the National Trust’s Register. The enclosure is the same six page typed classification report on Hopetoun by the National Trust which includes a reference list.hopetoun private hospital, hospitals, elsternwick, charles webb and son, melrose, italianate style, architectural features, glenhuntly road, korong road, duffy frank gavan, geoghegan hanbury c, cutts joseph e, hopetoun street, koorong road, caulfield, mansions, caulfield historical society, city of caulfield, webb charles, architectural styles, hopetoun lord, webb alfred william, webb florence mabel, cordner florence mabel, o’brien annie may, reeve charles frederick, haines edith faith, thomas albert edward, kopat pty ltd, cordner l -
Glen Eira Historical Society
Document - Hopetoun Street, 10, Elsternwick
... Korong Road... Hopetoun Street Elsternwick Weatherboard house Garages Korong Road ...Three items relating to valuations for this property: 1/One page typed letter from Weigall and Crowther Solicitors to S P Simmonds Estate Agency on behalf of Flora Lee, dated 03/10/1962, requesting valuation of 10 Hopetoun Street, Elsternwick re the Estate of G R Lee. 2/Four page typed valuation of 10 Hopetoun Street, Elsternwick, by Edward J K Callaghan, dated 10/10/1962. The valuation includes property measurements, title particulars, zoning, detailed information about the facilities in the surrounding area and also expansive details about the house on the property and other improvements. 3/Copy of a two page typed letter, from valuator WV Scott to George Lee, dated 22/12/1971, to Mr George Lee providing another later valuation of 10 Hopetoun Street, Elsternwick re the Estate late Flora Lee. Accompanying is a one page handwritten, undated and unattributed document of working notes.lee flora, lee george ralph, hopetoun street, elsternwick, weatherboard house, garages, korong road, king street, glenhuntly road, morton street, orong road, orrong road, kooyong road, lee george, callaghan edward j k, s p simmonds real estate agents auctioneer, scott w v, timber houses, murray street -
 Ballarat Tramway Museum
Slide - 35mm slide/s - set of 6, Noel Simons, 28 Feb. 1972
... Hill. 1206.2 - No. 5 at Garden Gully Loop, Mt. Korong road... - "No. 5 at Garden Gully Loop, Mt. Korong road, Ironbark." 1206.3... Hill. 1206.2 - No. 5 at Garden Gully Loop, Mt. Korong road ...Set of 6 transparencies taken on 28/2/1972 on Kodak mounts. 1206.1 - Bendigo No. 5 at Hayes St. Loop, en route for Quarry Hill. 1206.2 - No. 5 at Garden Gully Loop, Mt. Korong road, Ironbark. en route to Quarry Hill. Note the water column in the background. 1206.3 - No. 5 in View St. Bendigo, with the Commodore Motel in the background. 1206.4 - No. 6 en route for Golden Square in Fire Station loop, with the fire station building in the background. Photo taken after tram has passed photographer. 1206.5 - No. 6 in High St., running through Golden Square Shopping Centre, en route for Golden Square. Photo taken after tram has passed photographer. 1206.6 - No. 6 arriving at Charing Cross, bound for North Bendigo, with the City Family Hotel, ANZ bank and the Cenotaph (war memorial) in the background.Information written on in blue ink and date stamped on purple ink. 1206.1 - "No. 5 at Hayes Loop, Ironbark." 1206.2 - "No. 5 at Garden Gully Loop, Mt. Korong road, Ironbark." 1206.3 - "No. 5 in View St. just after start of double track near Barnard St." 1206.4 - "No. 6 in High St. at Fire Station loop." 1206.5 - "No. 6 in High St. running through Golden Square shopping centre." 1206.6 - "No. 6 arriving at Charing Cross from Golden Square."tramways, trams, bendigo, hayes st. loop, garden gully loop, view st., golden square, charing cross, tram 5, tram 6 -
Glen Eira Historical Society
Document - Elsternwick Congregational Church – Caulfield Union Church
... Road Korong Street Glen Eira Road Millar William Beckley G.A ...Photocopies of one page printed history of Caulfield Union Church dated 01/11/1889 by William Millar. Photocopies of printed four-page annual report of the Caulfield Union Church for the year ending 31/10/1890. Photocopy of four-page handwritten document dated 11/07/1894 dissolving the Caulfield Union Church and selling the land, buildings and effects, includes signatures.caulfield union church, glen eira road union church, caulfield, poole w. rev., reid john rev., day edwin rev., gregson john rev., macartney h.b. rev., st. mary’s caulfield, orrong road, korong street, glen eira road, millar william, beckley g.a., woodward thomas, chambers j.s., sargood f.t. sir., webb mr. justice, de lacy evans mr., gladman f. ernest, slatter herbert thomas, anderson adam, burgess arthur, religious groups -
Bendigo Historical Society Inc.
Document - Golden City Implements Foundary, Ironbark, Bendigo, 1960-1980s
... This foundary had been a landmark in Mt Korong Road... This foundary had been a landmark in Mt Korong Road for many years ...This foundary had been a landmark in Mt Korong Road for many years. It began with an Osborne and Mitchell. After 1914 when mining declined, it became the Golden City Implement foundary and the name can still be seen painted on on the facade which faces the intersection of Marong Road (Calder highway) and Eaglehawk Road. The interior is a mass of used and un-used machinery scattered amongst modern lathes and more modern apparatus. The yard was a fascinating graveyard of past times, with old mining and agricultural scrap everywheremixed up with coke and slag from the smelting sheds at the rear. A feature of the foundary was the manufacturer of cast iron lace. National Trust Survey Data Sheet and article from the Bendigo Advertiser November 4th 1981. Osbornes Ironbark Foundaryhistory, national trust bendigo collection, bendigo, foundary, iron bark bendigo -
Bendigo Historical Society Inc.
Document - Former Conrad Heinze Butcher's Shop, now demolished, Corner of Happy Valley Road and Wells Street, Long Gully, Bendigo, 1872
... . In 1883 he moved to Mt Korong Road Iron Bark, where he carried... he moved to Mt Korong Road Iron Bark, where he carried ...Source National Trust: Conrad Heinz Butchers Shop - Happy Valley Road. This building was a weatherboard cottage evidently built in three stages with the front door in the central part, planked by three paned double casements, six-paned sash windows in the rear section; front section and timber veradah with scrolled vallance. The architect and builders are unknown. The outside doors to the cellar and the simple chimney breast remain a notable feature. The original owner was Conrad Heinz a former mayor of Bendigo who with two brothers opened a butcher's shop in the building in 1872. In 1883 he moved to Mt Korong Road Iron Bark, where he carried on another thriving business and built a substantial house close by. When Conrad Heinz left Happy Valley Road, one brother had died, but his widow carried on the first butchering business with the help of a lad and one of her three daughters. The little shop and residence stood for over a century on the spot, almost untouched by modern progress. The shop was closed for 70 years at most. It was demolished about 1982.Data Forms on the house, various letters to and between the Bendigo Council, the National Trust and the owners of the house.history, national trust bendigo collection, bendigo, happy valley road long gully, butcher's shop bendigo, conrad heinze -
 Ballarat Tramway Museum
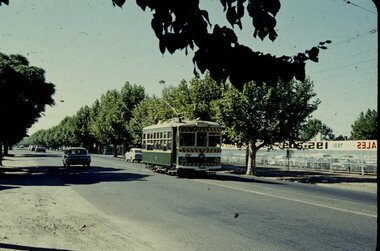
Slide - 35mm slide/s - set of 10, Campbell Duncan, Jan. 1971
... Overbridge, Mt Korong Road. .8 - No. 17 (inbound to City and Quarry..., Mt Korong Road. .8 - No. 17 (inbound to City and Quarry Hill ...Set of 10 Ferraniacolor slides - cardboard mounts taken on either 10/1/71 or 16/1/71. .1 - Birney No. 30, Golden Square line, inbound near Cathedral with car yard in background. .2 - ditto, with Cathedral gardens in background. .3 - single trucker, with two SEC roof adverts, entering Nolan St enroute to North Bendigo. Shows the driver sitting in a side on shot. A 4 square store in the background, with a fading advert for "Peeled Tomatoes". .4 - No. 6 turning from Nolan St into McCrae St with 4 square store in background. .5 - No. 26 at Quarry Hill with cemetery in background. .6 - No. 6 at the North Bendigo Terminus .7 - No. 26 outbound to Eaglehawk on the Railway Overbridge, Mt Korong Road. .8 - No. 17 (inbound to City and Quarry Hill) and another bogie crossing at a loop on the Eaglehawk line. Both trams have SEC roof adverts. The driver of the outbound car is boarding the tram. Based on .9, it is No. 3 at Long Gully. .9 - No. 3 waiting at Long Gully Loop . .10 - No. 26 at Quarry Hill terminus, with destination of Eaglehawk.In ink on slide: .1 - "1/2 mile out on Golden Square line - 10/1/71 (Sun)." .2 - "1/2 mile out on Golden Square line - 10/1/71" .3 - "Has just rounded curve near lake Weeroona on North Bendigo line - 10/1/71 (Sun)." .4 - "16/1/71" .5 - " 10/1/71 (Sun)." .6 - "North Bendigo terminus, 16/1/71 (Sat)" .7 - "10/1/71 (Sun) c 3pm" .8 - "Cross Eaglehawk line - 10/1/71 (Sun)." .9 - "Jackson St Loop on E'Hk line awaiting up - 10/1/71 " .10 - "Quarry Hill terminus Bendigo - - 10/1/71"tramways, trams, bendigo, golden square, high st, nolan st, north bendigo, quarry hill, long gully, railway bridge, tram 30, tram 6, tram 26, tram 17, tram 3 -
 Ballarat Tramway Museum
Slide - 35mm slide/s - set of 11, Eldon Hogan, mid 1960's to early 1970's
... at the Mt. Korong Road and the Calder Highway, with the Ampol... at the Mt. Korong Road and the Calder Highway, with the Ampol ...Set of 11 Agfa Plastic mounted slides - from the Eldon Hogan collection - possibly on an ARE Bendigo tours - mid 1960's (black destination rolls) and late 1960's or early 1970's. Scanned on the Canon scanner at the depot 15/12/1971 at the time of the installation of the scanner. .1 - No 18 with Lake Weeroona in the background - possibly at the same time as the tour with No. 18, though showing destination of Charing Cross. .2 - ditto .3 - No. 25 and two following trams on a special tour, note the white disc - Quarry Hill line? .4 - No. 29 on the Eaglehawk line at the Mt. Korong Road and the Calder Highway, with the Ampol Service station in the background. .5 - No. 29 passing Lake Weeroona with Destination of Nth Bendigo - has a Briquettes Roof Advertisement., .6 - No. 26 ditto - with two SEC Roof Advertisements. .7 - No. 24 leaving Charing Cross for Golden Square with The Beehive building, Ezywalkin, Coca Cola and the Fountain Shopping Centre in the background. .8 - No. 29 and a bogie tram at the Golden Square terminus with Golden Square Hotel and Victoria Bitter fence in the background. No. 29 has a SEC Briquettes roof advertisement. .9 - No. 29, with the Cathedral in background. Tram has a SEC Briquettes roof advertisement and destination of Golden Square. .10 - side view of a bogie tram on the Eaglehawk line? Tram has a Electric cooking roof advertisement. Photo has been over exposed. .11 - Single trucker, Violet St with the Central Deborah mine head in the background. Tram has two SEC Electric Cooking roof advertisements. tramways, trams, bendigo, lake weeroona, eaglehawk, golden square, charing cross, central deborah, tram 18, tram 25, tram 29, tram 24 -
 Ballarat Tramway Museum
Slide - 35mm slide/s, Noel Simons, 21/11/1962 12:00:00 AM
... . 1188.5 - Bendigo 4 in Mt Korong Road. Tram inbound... St Loop. 1188.5 - Bendigo 4 in Mt Korong Road. Tram inbound ...Set of 17 transparencies taken on 21/11/1962 on Kodak mounts. 1188.1 - Bendigo No. 11 at Depot Junction McCrae and Arnold St. with driver/conductor changing points. 1188.2 - Bendigo No. 4 at Charing Cross, side on photo, with City Club Hotel and Alexandra Fountain in the background. Tram has Castrol and SEC 'Electric Cooking' ads. 1188.3 - Bendigo No. 4 climbing View St. after tram has passed photographer. Tram has Streets Ice Cream and Cohns Soft Drinks ad on rear dash panel. In the background are the buildings in View St., including the Princess Theatre. Tram has destination of Eaglehawk. 1188.4 - Trams 2 and 4 crossing at the California Gully or Thorpe St Loop. 1188.5 - Bendigo 4 in Mt Korong Road. Tram inbound with destination of Quarry Hill, just leaving Garden Gully Loop. 1188.6 - Bendigo 4 and 17 crossing at the Hayes St. or Iron Bark Gully Loop. No. 17 bound for Eaglehawk, No. 4, Quarry Hill. 17 has two SEC roof ads and a white horse whiskey ad. 1188.7 - No. 17 bound for Eaglehawk, soon after leaving California Gully. Has large mullock heap in background. 1188.8 - Bendigo 2 and 17 crossing at the Thorpe St. or California Gully Loop. Has butchers shop in background. 1188.9 - Bendigo 17 at the Eaglehawk terminus. Has destination of Quarry Hill. In background is the hotel and shops at the terminus, showing ads for "Melbourne Bitter". Tram has two SEC 'Electric Cooking' ads. Driver and conductor about to assist two lady passengers with a pram and baby. 1188.10 - No. 17 at Eaglehawk terminus, awaiting departure. Has Eaglehawk Town Hall and Post Office in background. Tram has a Whitehorse Whiskey ad on the front dash panel. 1188.11 - No. 3 in High St. Eaglehawk, with destination of Eaglehawk. Has the shops on the south side of High St. in the background, including the Eaglehawk fish shop. Tram has two roof ads, one an SEC roof ad, and Cohns Drinks and Streets Ice cream ads on front dash panel. 1188.12 - as above, but after tram has passed photographer. Note the centre of the road poles. 1188.13 - No. 2 outbound for Eaglehawk at the intersection of Mt. Korong Road and the Calder Highway. Photo taken after the tram has passed the photographer. Has an Ampol service station in the background. 1188.14 - No. 11 leaving the Bendigo depot, crossing the bridge, with the Scrubber car in the background. 1188.15 - No. 21 at the North Bendigo terminus. Tram has destination of Golden Square and Cohns drink ad on front dash and two roof ads on side. 1188.16 - No. 11 on Golden Square route, in High St. at intersection with Old High St. 1188.17 - No. 11 at the Golden Square terminus, conductor turning the pole. Hotel on the left side of the photo. Note the road works barrier and red flag behind the tram. Slide has an end of roll mark on the right hand side of the image.Information written on in black ink and date stamped on purple ink. 1188.1 - "Birney car No. 11 in McCrae St. at Cnr of Arnold about to run into depot, Bendigo" 1188.2 - "No. 4 at Alexandra Fountain, Charing Cross Bendigo" 1188.3 - "No. 4 climbing the View St. Hill from Charing Cross, Bendigo (Eaglehawk Route)" 1188.4 - "No. 4 and 2 at Thorpe St. Loop, California Gully" 1188.5 - "No. 4 in Mt Korong Rd., Long Gully, Near Havilah Rd. (Bendigo) (Eaglehawk Route)" 1188.6 - "Nos. 17 and 4 crossing on Hayes St. Loop, Ironbark, Bendigo" 1188.7 - "No. 17 soon after leaving California Gully (Eaglehawk Route)" 1188.8 - "No.2 and 17 crossing on Thorpe St. Loop, California Gully (Eaglehawk Route)" 1188.9 - "No. 17 at Eaglehawk terminus" 1188.10 - "No. 17 at Eaglehawk terminus" 1188.11 - "No. 3 in High St. Eaglehawk" 1188.12 - "No. 3 nearing Eaglehawk terminus" 1188.13 - "No. 2 in Mt. Korong Rd., Ironbark. Calder highway on left (Eaglehawk route) 1188.14 - "Birney car No. 11 leaving Bendigo depot. Scrubber car at rear" 1188.15 - "No. 21 at North Bendigo Terminus" 1188.16 - "Birney car No. 11 in High St. Bendigo at intersection with Old High Street (Golden Square Route)" 1188.17 - "Birney Car No. 11 at Golden Square terminus, High St., Bendigo". tramways, trams, bendigo, depot junction, charing cross, view st., eaglehawk, north bendigo, golden square, tram 2, tram 3, tram 4, tram 11, tram 17, tram 21, tram scrubber -
 Ballarat Tramway Museum
Slide - 35mm slide/s - set of 19, Noel Simons, 26/02/1972 12:00:00 AM
... - No. 26 entering Garden Gully Loop, Mt. Korong Road, Ironbark... - No. 26 entering Garden Gully Loop, Mt. Korong Road, Ironbark ...Set of 18 transparencies taken on 26/2/1972 on Kodak mounts. 1203.1 - Bendigo 5 at Eaglehawk terminus - with new traffic works. 1203.2 - No. 5 climbing the High St. hill Eaglehawk with the buildings on the east side in the photo. 1203.3 - No 2 descending the road over rail bridge at Job's Gully, heading for Quarry Hill. 1203.4 - as for 1202.3, but more side on. Tram has two SEC roof ads. 1203.5 - as for 1202.4 1203.6 - No. 26 entering Garden Gully Loop, Mt. Korong Road, Ironbark. Tram en route to Eaglehawk. Water column on right hand side of photograph. 1203.7 - No. 2 on the Eaglehawk route, Iron Bark area?, bound for Quarry Hill. 1203.8 - as for 1202.7, but photo taken after tram has past photographer. 1203.9 - No. 5 at Eaglehawk terminus, night photo. Tram has arrived at terminus, showing Quarry Hill, pole turned, but the tram lights have yet to be turned around. 1203.10 - as for 1202.9, but lights have been turned around. 1203.11 - No. 26 climbing the View St. Hill near the Commodore Hotel. Has Campbells Electrical Services building in the background. Photo taken after the tram has passed the photographer. 1203.12 - No. 7 end on photograph, at Golden Square, destination showing Golden Square - night photo. 1203.13 - number not used. 1203.14 - as for 1202.12, but partially side on, has a passenger looking out the tram. 1203.15 - as for 1202.12, but with hotel in the background. 1203.16 - No. 26 and 2 at Charing Cross, night photo. Tram 26 en route to Quarry Hill, 2 to Eaglehawk. 1203.17 - Interior photo of No. 26, at night. 1203.18 - No. 26 at the Quarry Hill terminus as night. 1203.19 - as for 1202.18, but central portion of the tramcar.Information written on in blue ink and date stamped on purple ink. 1203.1 - "No. 5 at Eaglehawk terminus" 1203.1 - "No. 5 in High St. Eaglehawk" 1203.3 - "No. 2" 1203.4 - "No. 2" 1203.5 - "No. 2" 1203.6 - "No. 26 at Garden Gully Loop Mt Korong Rd., Ironbark" 1203.7 - "No. 2" 1203.8 - "No. 2" 1203.9 - "No. 5 at Eaglehawk terminus" 1203.10 - "No. 5 at Eaglehawk terminus" 1203.11 - "No. 26 in View St. Near the Commodore Motel" 1203.12 - "No. 7 at Golden Square Terminus" 1203.14 - "No. 7 at Golden Square Terminus" 1203.15 - "No. 7 at Golden Square Terminus" 1203.16 - "Nos. 26 and 2 at Charing Cross" 1203.17 - "Interior of No. 26" 1203.18 - "No. 26 at the Quarry Hill terminus" 1203.19 - "No. 26 at the Quarry Hill terminus "tramways, trams, bendigo, eaglehawk, bridges, iron bark gully, night photo, quarry hill, golden square, tram 2, tram 5, tram 7, tram 26 -
 Ballarat Tramway Museum
Slide - 35mm slide/s - set of 17, Noel Simons, 20/11/1962 12:00:00 AM
... at Eaglehawk terminus" 1187.5 - "No. 18 in Mt Korong Road, Long Gully... at Eaglehawk terminus" 1187.5 - "No. 18 in Mt Korong Road, Long Gully ...Set of 17 transparencies taken on 20/11/1962 on Kodak mounts. 1187.1 - Bendigo No. 2 at the Quarry Hill terminus, showing destination of Quarry Hill. Has Cohns Drinks and Streets Ice Cream ads on dash panel, a SEC 'electric cooking' roof ad and another roof ad. Shows the Y terminus at this location, but tram standing just before it. Overhead in position. 1187.2 - as above, but closer up. 1187.3 - as above, but from the north side, showing cemetery in the background. 1187.4 - Bendigo No.3 at Eaglehawk terminus. Tram showing destination of Quarry Hill. Has the various buildings at Eaglehawk in the background including the Foodland store. Has Streets Ice cream and White Horse Whiskey ads on the dash panel. 1187.5 - Bendigo No. 18 at Garden Gully crossing loop, in bound, with destination of Eaglehawk. Passengers waiting for an Eaglehawk tram at the stop. Has a white horse whiskey ad on dash panel and SEC roof ads. Conductor standing in doorway looking out. 1187.6 - Bendigo No. 7 inbound in Nolan St. at cnr of McCrae St. showing destination of Golden Square. Has Streets Ice cream ad on dash panel and a Castrol Roof ad. 1187.7 - Bendigo No. 19 at the North Bendigo terminus with railway level crossing in background. Tram has a Cohns Drinks ad and an SEC 'Electric Cooking' roof ad. 1187.8 - Bendigo No. 2 at the Quarry Hill terminus, looking back into Bendigo, showing destination of Eaglehawk. 1187.9 - Bendigo No. 21 in McCrae St, near Nolan St outbound for North Bendigo. Photo taken after tram has passed photographer. 1187.10 - Bendigo Nos. 4 and 26 at Charing Cross in View St. with fountain alongside and the Beehive, Ezywalkin Buildings in the background. No. 26 has a Sandhurst Milk and SEC 'Electric Cooking' roof ad. 1187.11 - close up of 22E maximum traction truck and folded footstep. 1187.12 - Bendigo No. 19 at Charing Cross terminus, after tram has passed photographer, showing destination of North Bendigo, with the Beehive building in the background and passengers boarding tram. 1187.13 - Bendigo No. 11, turning from View St. into Pall Mall, showing Special with the conductor holding point bar. Has the Beehive and Ezywalkin Buildings in the background. 1187.14 - No. 7 at Charing Cross terminus, in Pall Mall, bound for Golden Square. Has the Beehive and Ezywalkin buildings in the background and passengers waiting at the tram stop. 1187.15 - No. 18 at the Charing Cross terminus, bound for Eaglehawk. Has the Beehive and Ezywalkin buildings in the background and passengers waiting at the tram stop. Also has the 'Safety Zone' sign in the photograph. 1187.16 - No. 2 at Quarry Hill terminus, night or dusk photo. Tram showing destination of Depot. 1187.17 - No. 26 at Charing Cross, night photo. Tram has destination of Quarry Hill, but is on the line for Eaglehawk. Photo looks along Mitchell St. Also shows Safety Zone sign. Information written on in black ink and date stamped on purple ink. 1187.1 - "No. 2 at Quarry Hill terminus Bendigo" 1187.2 - "No. 2 at Quarry Hill terminus Bendigo" 1187.3 - "No. 2 at Quarry Hill terminus Bendigo" 1187.4 - "No. 3 at Eaglehawk terminus" 1187.5 - "No. 18 in Mt Korong Road, Long Gully at cnr of Havilah Road (Eaglehawk Route)" 1187.6 - "No. 7 in Nolan St. Bendigo, at Cnr of McCrae St., near lake Weeroona, (North Bendigo Route)' 1187.7 - "No. 19 at North Bendigo terminus" 1187.8 - "No. 2 at Quarry Hill terminus" 1187.9 - "No. 21 in McCrae St. Bendigo, near Nolan St. (North Bendigo Route) 1187.10 - "4 and 26 at Alexandra Fountain, Charing Cross Bendigo" 1187.11 - "Truck of Bogie Car, Bendigo Tramways" 1187.12 - "No. 19 in Pall Mall at Charing Cross, Bendigo" 1187.13 - "Birney car No. 11 entering Pall Mall from View St. at Charing Cross Bendigo" 1187.14 - "No. 7 in Pall Mall at Charing Cross, Bendigo" 1187.15 - "No. 18 at Alexandra Fountain, Charing Cross, Bendigo" 1187.16 - "No. 2 at Quarry Hill terminus, Bendigo" 1187.17 - "No. 26 at Alexandra Fountain, Charing Cross, Bendigo" tramways, trams, bendigo, quarry hill, eaglehawk, north bendigo, maximum traction, night photo, tram 2, tram 3, tram 4, tram 7, tram 11, tram 18, tram 19, tram 21, tram 26 -
 Ballarat Tramway Museum
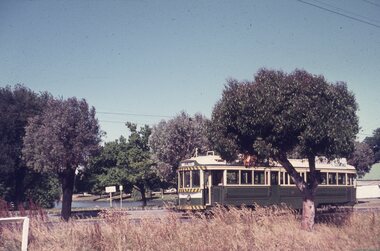
Slide - 35mm slide/s - set of 25, Noel Simons, 26/02/1972 12:00:00 AM
... . 1204.6 - No. 5 at intersection of Mt Korong Road Ironbark.... 1204.6 - No. 5 at intersection of Mt Korong Road Ironbark ...Set of 25 transparencies taken on 26/2/1972 on Kodak mounts. 1204.1 - Bendigo No. 5 - just arrived at Manchester Loop near Havilah Road, Long Gully. Photo taken after tram has passed photographer. 1204.2 - No. 26 in Backhaus St. Long Gully passing William St, en route to Quarry Hill. Photo taken after tram has passed photographer. 1204.3 - No. 5 climbing the High St. Hill Eaglehawk, heading for Quarry Hill with the buildings on the West side of High St. in the background, including the Eaglehawk Town Hall. 1204.4 - as for 1204.3, but tram close up. 1204.5 - as for 1204.3, but after tram has passed photographer. 1204.6 - No. 5 at intersection of Mt Korong Road Ironbark and Calder Highway, with the AMPOL service 'station in the background. Photo taken after tram has passed photographer. 1204.7 - No. 26 en route to Quarry Hill shortly after leaving Needle Loop, passing William St., Long Gully. 1204.8 - No. 5 at California Gully Loop, picking up a passenger, with the shops at Long Gully in the background. Photo taken after tram has passed photographer. 1204.9 - No. 5 in Long Gully, en route to Quarry Hill. Photo taken after tram has passed photographer. 1204.10 - No. 2 at Eaglehawk terminus with the Eaglehawk Town Hall and Post Office in the background. Tram has two SEC roof ads. 1204.11 - No. 2 at Eaglehawk terminus, close up. 1204.12 - as for 1204.11, but through the park gates. 1204.13 - as for 1204.11, but with tram stop shelters in the foreground and buildings on the West side of High St in the background. 1204.14 - No. 2 in Mt. Korong Rd, midway between California Gully Loop and Needle Loop. Photo taken after tram has passed photographer. 1204.15 - No. 5 in Long Gully, en route to Quarry Hill. 1204.16 - as for 1204.15, but with trams departed loop. Has an ESSO service station in the background. 1204.17 - No. 26 leaves Charing Cross up View St.. Photo taken after tram has passed photographer. Has Armstrong Tyre Service, Cohns Drinks ad on a building and the T&G building in the background. Also Firestone ads on the tyre service building. 1204.18 - No. 5 waits at Charing Cross with the Alexandra Fountain in the background. Tram has two SEC roof ads, 'Everything s fine in my all electric kitchen' and 'Electricity Best for Cooking'. Has RACV, Colonial Mutual Life buildings in the background and the planting areas around Charing Cross gardens in the foreground. 1204.19 - No. 21 en route to North Bendigo arrives at Charing Cross, with passengers waiting to board. No. 5 in the background. In the background is the Fountain Gate Plaza building and the City Family Hotel. 1204.20 - as for 1204.19, but with No. 7 en route to Golden Square. 1204.21 - as for 1204.19, but closer up. 1204.22 - as for 1204.18 1204.23 - No. 25 in Nolan St. near the crossing of Bendigo Creek, running a special tram tour. 1204.24 - No. 25 on a special charter, in Weeroona Ave. at Cnr of Caledonia St. passing the Gas works. 1204.25 - Nos. 25 (showing Golden Square), 7 and 26 at Charing Cross. Has fountain in the background.Information written on in blue ink and date stamped on purple ink. 1204.1 - "No. 5 at Manchester Loop, near Havilah Rd. Long Gully." 1204.2 - "No. 26 in Backhaus St. Long Gully passing William St." 1204.3 - "No. 5 in High St. Eaglehawk." 1204.4 - "No. 5 in High St. Eaglehawk." 1204.5 - "No. 5 in High St. Eaglehawk." 1204.6 - "No. 5 in Mt. Korong Rd., Ironbark, passing Calder Highway Junctn." 1204.7 - "No. 26 shortly after leaving Needle Loop, passing William St., Long Gully. No. 5 cresting hill in distance." 1204.8 - "No. 5 at California Gully Loop." 1204.9 - "No. 5 in Long Gully" 1204.10 - "No. 2 at Eaglehawk terminus." 1204.11 - "No. 2 at Eaglehawk terminus." 1204.12 - "No. 2 at Eaglehawk terminus." 1204.13 - "No. 2 at Eaglehawk terminus." 1204.14 - "No. 2 in Mt. Korong Rd, midway between California Gully Loop and Needle Loop. 1204.15 - "Nos. 2 and 26 crossing at Long Gully." 1204.16 - "No. 26 leaves Long Gully loop for Eaglehawk as No. 2 pulls out of the far end towards Bendigo" 1204.17 - "No. 26 beginning the climb up View St. from Charing Cross." 1204.18 - "No. 5 at Charing Cross." 1204.19 - "No 21 arrives at Charing Cross from Golden Square while No. 5 awaits departure time for Eaglehawk." 1204.20 - "Nos. 7, 21, and 2 (behind which is No. 5) at Charing Cross." 1204.21 - "Nos. 7, 21, and 2 at Charing Cross." 1204.22 - "No. 5 at Charing Cross." 1204.23 - "No. 25 in Nolan St. near Bendigo creek crossing" 1204.24 - "No. 25 in Weeroona Ave. at cnr of Caledonia St." 1204.25 - "Nos. 25, 7, 26 and 2 (behind 26) at Charing Cross."tramways, trams, bendigo, eaglehawk, long gully, california gully, charing cross, north bendigo, tram 2, tram 5, tram 7, tram 21, tram 25, tram 26 -
 Ballarat Tramway Museum
Slide - 35mm slide/s - set of 24, Noel Simons, 20/05/1971 12:00:00 AM
... Service building in the background. 1195.9 - No. 5 in Mt Korong... Service building in the background. 1195.9 - No. 5 in Mt Korong ...Set of 24 transparencies taken on 20/5/1971 on Kodak mounts. 1195.1 - Bendigo 19 arriving at Charing Cross en route to North Bendigo with Fountain Plaza and the City Family Hotel in the background. No. 19 has two roof ads for the SEC. -'Electricity better for cooking' and 'Everything's under control in my all electric kitchen' 1195.2 - as above, but standing at the Charing cross stop, with the Beehive Stores and other buildings along the east side of Pall Mall in the background. 1195.3 - No 21 ex Golden Square crossing View St. trackwork in front of No. 25 waiting to depart for Quarry Hill. No.21 has two roof ads (as for No.19 in 1195.1) and No.25 has one SEC roof ad and another. Ezywalkin sign in the background, and Fountain Plaza. 1195.4 - as for 1195.3, but after 21 has arrived and 25 left for Quarry Hill. Has Ezywalkin store and the Beehive store in the background. 1195.5 - No. 5 at the Eaglehawk terminus. Photo taken with a cannon in foreground looking along High St. Eaglehawk. Has shops on the west side of High St. in the background. 1195.6 - No. 5 at the Eaglehawk terminus, close up of the rear of the tram - note tow bar arrangement. Has destination of Quarry Hill. 1195.7-Nos.25 and 5 crossing at the Thorpe St. Loop, California Gully. No. 25 bound for Eaglehawk (has SEC Briquette and electric cooking roof ads) and 5 en route for Quarry Hill with a SEC and Cinzano roof ad. 1195.8 - as for 1195.7, but after trams have passed each other. Has Borough Auto Service building in the background. 1195.9 - No. 5 in Mt Korong Road, towards Bamard Street, photo taken after tram has passed photographer. 1195.10 - No. 30 at the Golden Square terminus with the Milk Bar on the right hand side of the photograph. 1195.11 - No. 30 inbound at Fire Station Loop, High St. Golden Square. Has old fire station in the background. Passengers are boarding the tramcar. 1195.12 - No. 30 in High St, bound for North Bendigo between Vine and Wattle Streets. 1195.13 - No. 5 bound for Eaglehawk waits at Iron Bark Gully Loop, at Hayes St. 1195.14 - No. 5 and No. 2 crossing at Iron Bark Gully Loop. 1195.15 - No. 5 bound for Eaglehawk leaving the Manchester Loop, Long gully. 1195.16 - No. 5 passing William Street, Long Gully en route to Eaglehawk. 1195.17 - No. 5 just before the California Gully Crossing Loop. 1195.18 - Nos. 5 and 26 crossing at California Gully crossing Loop. No. 5 heading to Eaglehawk, 26, Quarry Hill. 1195.19 - No. 5 in High St. Eaglehawk with Bob Moyle's Victoria Hotel and the TAB in the background. 1195.20 - No. 5 in High St. Eaglehawk approaching the terminus. Photo taken after the tram has passed the photographer. Has Foodland store and J. Best Fruit supply in the background, along with Eaglehawk Town Hall. 1195.21 - No. 5 at the Eaglehawk terminus, photo taken along seldom used track along High St. 1195.22 - as for 1195.22 - but at the very end of the track. 1195.23 - No. 5 en route for Quarry Hill climbs High St. Eaglehawk with the Victoria Hotel and Eaglehawk Town Hall in the background. 1195.24 - No. 5 and 25 crossing at Jobs Gully Loop. Note 25 has a black on white destination roll, while No. 5 has a white on black destination roll. Information written on in black ink and date stamped on purple ink. 1195.1 - "No. 19 arrives at Charing Cross Bendigo from Golden Square" 1195.2 - "No. 19 about to leave Charing Cross for North Bendigo" 1195.3 - "No. 25 awaiting departure for Quarry Hill, watches No. 21 arrive at Charring Cross from Golden Square" 1195.4 - "No. 21 on North Bendigo service and No. 25 on Quarry Hill run await departure at Charing Cross" 1195.5 - "No. 5 at Eaglehawk terminus" 1195.6 - "No. 5 at Eaglehawk terminus" 1195.7 - "Nos. 5 and 25 crossing at Thorpe St. Loop, California". 1195.8 - "Nos. 25 and 5 crossing Thorpe St. Loop, California Gully". 1195.9 - "No. 5 descending Mt Korong Rd. towards Bamard St." 1195.10 - "Birney car No. 30 at Golden Square terminus" 1195.11 - "Birney car No. 30 in High Street near Thistle Street (Fire Station Loop)" 1195.12 - "No. 30 in High St. between vine and Wattle Streets" 1195.13 - "No. 25 at Hayes Street Loop Iron Bark". 1195.14 - "Nos. 2 and 5 crossing at Hayes Street Loop Iron Bark" 1195.15 - "No. 5 at Manchester Loop opposite Havilah Road, Long Gully" 1195.16 - "No. 5 passing William Street, Long Gully". 1195.17 - "No. 5 at California Gully" 1195,18 - "Nos. 26 and 5 at Thorpe St. Loop, California Gully". 1195.19 - "No. 5 in High St. Eaglehawk". 1195.20 - "No. 5 approaching Eaglehawk terminus" 1195.21 - "No. 5 at Eaglehawk terminus" 1195.22 - "No. 5 at Eaglehawk terminus" 1195.23 - "No. 5 in High St. Eaglehawk" tramways, trams, bendigo, charing cross, eaglehawk, california gully, golden square, iron bark gully, jobs gully, tram 2, tram 5, tram 19, tram 21, tram 25, tram 26, tram 30 -
 Eltham District Historical Society Inc
Document - Property Binder, 1524 Main Road, Research
Handwritten notes, undated, on A & G Bills horse trough Main Road Research. Handwritten notes, undated, "Annie and George Bills" listing locations of other Bills horse troughs. Typed notes by Dianna Basset-Smith, July 2003, her memories of the Bills trough at Research. Letter, RSPCE to Andrew Lemon, 17 December 1993, lists other horse troughs known to the RSPCA, use of money from Bills estate managed by John Crook. Newspaper article: Legacy is set in concrete, The Weekly Times, 25 June 2003, history of Bills horse troughs from 1930s, biography of George Bills and Annis Swarm [correctly Swann], quoting Barbie Roach, Gorge Bills' great-grandneice, notes locations of other Bills troughs. Newspaper article: No drought in water troughs, Weekly Times, 9 July 2003, Response to 25 June 2003 article, readers reporting Bills troughs in their area, photograph of trough at Korong Vale. Newspaper article: The horse lover, (photocopy, no publication details), Decaying Bills horse tough in Geelong council yard proposed to be moved to RSPCA, history of George Bills, Annis Bills (nee Swann), legacy, great-grandneice Judith Crook writing Bills history. Email exchange, Eltham District Historical Society and Geraldine Sanderson 2015: enquiry re Bills trough at Research for planned history of Bills trough, and provision of EDHS-held information.Annis Elizabeth Swannmain road, research (vic.), horse troughs, annis and george bills, bills trough, audrey bills, annis bills, george bills, barbie roach, royal society for the prevention of cruelty to animals, judith crook, audrey morton, kathleen wood, acclimatisation society, john lugg, ian stacey, harry bills, annis swann, james boreas crook, william buesst, myer emporium, richard bills, buesst and bills brothers, daisy bills -
Glen Eira Historical Society
Article - Elsternwick Congregational Church – Caulfield Union Church
A two page article Elsternwick Congregational Church by J. O’Donnell, No. 12 October 1974 describing the church’s history. Includes references and exterior photograph. Undated typed Short History of Elsternwick Congregational Church by Jim McLoghlin. Brief handwritten note dated August 1984 by Jim McLoghlin about the church’s history. Brief typed, undated, unattributed not about the church’s early history. Brief undated, handwritten note by Jim McLoghlin about the church’s history in the 1970s and 1980s. Photocopy of a page from A Coming Together, entitled Elsternwick Congregational Church: Some Memories by Jim McLoghlin dated 01/01/1989. Two pages of undated typed and handwritten notes by Trevor Hart concerning the early history of the church including The Fincham Organ. Printout of brief biographical details of Rev. William Poole, first resident pastor at Caulfield Union Church, from a website. URL is included. Photocopy of brief article from The Southern Baptist of 26/01/1911 describing the life of Rev. John Reid, an early pastor at Caulfield Union Church after his recent death. Undated, unattributed handwritten brief note of rate book entries from 1879 and 1888 for the Caulfield Union Church site.elsternwick congregational church, o’donnell j., caulfield union church, watts thomas, black chapel, hawthorn road, balaclava road, glen eira road, orrong road, fulton thomas, rolfe g., jordan w.f., macartney h.b. rev., st. mary’s church of england, elsternwick, korong street, king street, de lacy evans g., mcmurtie mcnaughton and stewart, copland osric rev., day edwin rev., day louisa, day annie, day jeanie, cromarty school for girls, sandham street, presentation convent, pedler b.r., st. john’s uniting church, clarke g., clarke graham, mcloghlin jim, prahran grove, garden street, poole j.l. rev., poole william, old grammar school, regent street, little kids contact, st. john’s presbyterian church, pedler b.r., mills miss, shaw mary, mcloghlin mrs., martin les, riddle rev., cromarty girls school, gregson w. rev., mcnaughton mcmurtie and stewart, de lacy evans g., fincham geo., fletcher rich rev., reid john, beauchamp mr., jubilee hall st. mary’s anglican church, architectural styles, architectural features, gothic revival architecture, fonts, clergy, religious groups, sunday schools, congregational church, religious structures and establishments -
 Glen Eira Historical Society
Document - Elsternwick Congregational Church – Caulfield Union Church
... Korong Street Glen Eira Road King Street De Lacy Evans G ...Photocopy of extract of Caulfield Conservation Study by Andrew Ward dated September 1994. Includes brief history and description of Elsternwick Congregational Church and black and white exterior photograph and references. Printed page, dated and source unknown, with sketch of the church and a brief history. Five colour, one black and white exterior, photographs date and photographer unknown.elsternwick congregational church, caulfield union church, orrong road, architectural features, architectural styles, gothic revival architecture, elsternwick, towers, korong street, glen eira road, king street, de lacy evans g., mcmurtie mcnaughton and stewart, copland osric rev., uniting church, congregational church, corrong street, religious structures and establishments -
Glen Eira Historical Society
Document - Hopetoun, Hopetoun Street, 2, Elsternwick
... Architectural styles Webb Charles Architects Glenhuntly Road Elsternwick ...Photocopy of Caulfield Conservation Study for this address, conducted in September 1994. It outlines a description of the Italianate villa architectural aspects of Hopetoun Private Hospital, the history of the owners of the property and the recommendations for inclusion on the National Estate Register and for the planning Scheme control. By Andrew Ward. Includes two photocopied photographs of the exterior of the exterior.italianate style, hopetoun, melrose, hospitals, verandahs, mansions, towers, architectural features, architectural styles, webb charles, architects, glenhuntly road, elsternwick, cutts joseph, korong street, king street, hopetoun street, geoghegan hanbury, webb alfred, kopat pty ltd, webb florence mabel, o’brien annie, reeve charles, haines edith, thomas albert, ward andrew, hopetoun private hospital -
Glen Eira Historical Society
Document - Palmyra, 88 Orrong Road, Elsternwick
Partial conservation study by Andrew Ward dated September 1994. Gives property’s history and owner/occupancy til 1925. Notes that Palmyra is significant as an early arts and craft influenced villa in Caulfield.orrong road, palmyra, gardiner alexander, elizabeth street, elsternwick, altona, little a. d., korong street, king street, caulfield, architectural styles, ward andrew, edwardian style